
Zendesk + OpenAI
Automation with n8n
Last updated: October 2025
Project Goals
The goal of this project was to automate customer support workflows by connecting Zendesk, OpenAI, and n8n.
- When a new ticket arrives in Zendesk, the system automatically triggers an n8n workflow that sends the ticket details to an OpenAI Assistant.
- This Assistant is trained with company-specific information stored in an attached file, allowing it to generate a suggested internal note — a draft response for the support team to review and send.
The automation helps reduce response time, maintain consistent tone and accuracy in replies, and improve agent efficiency — all while keeping a human in control for the final response.
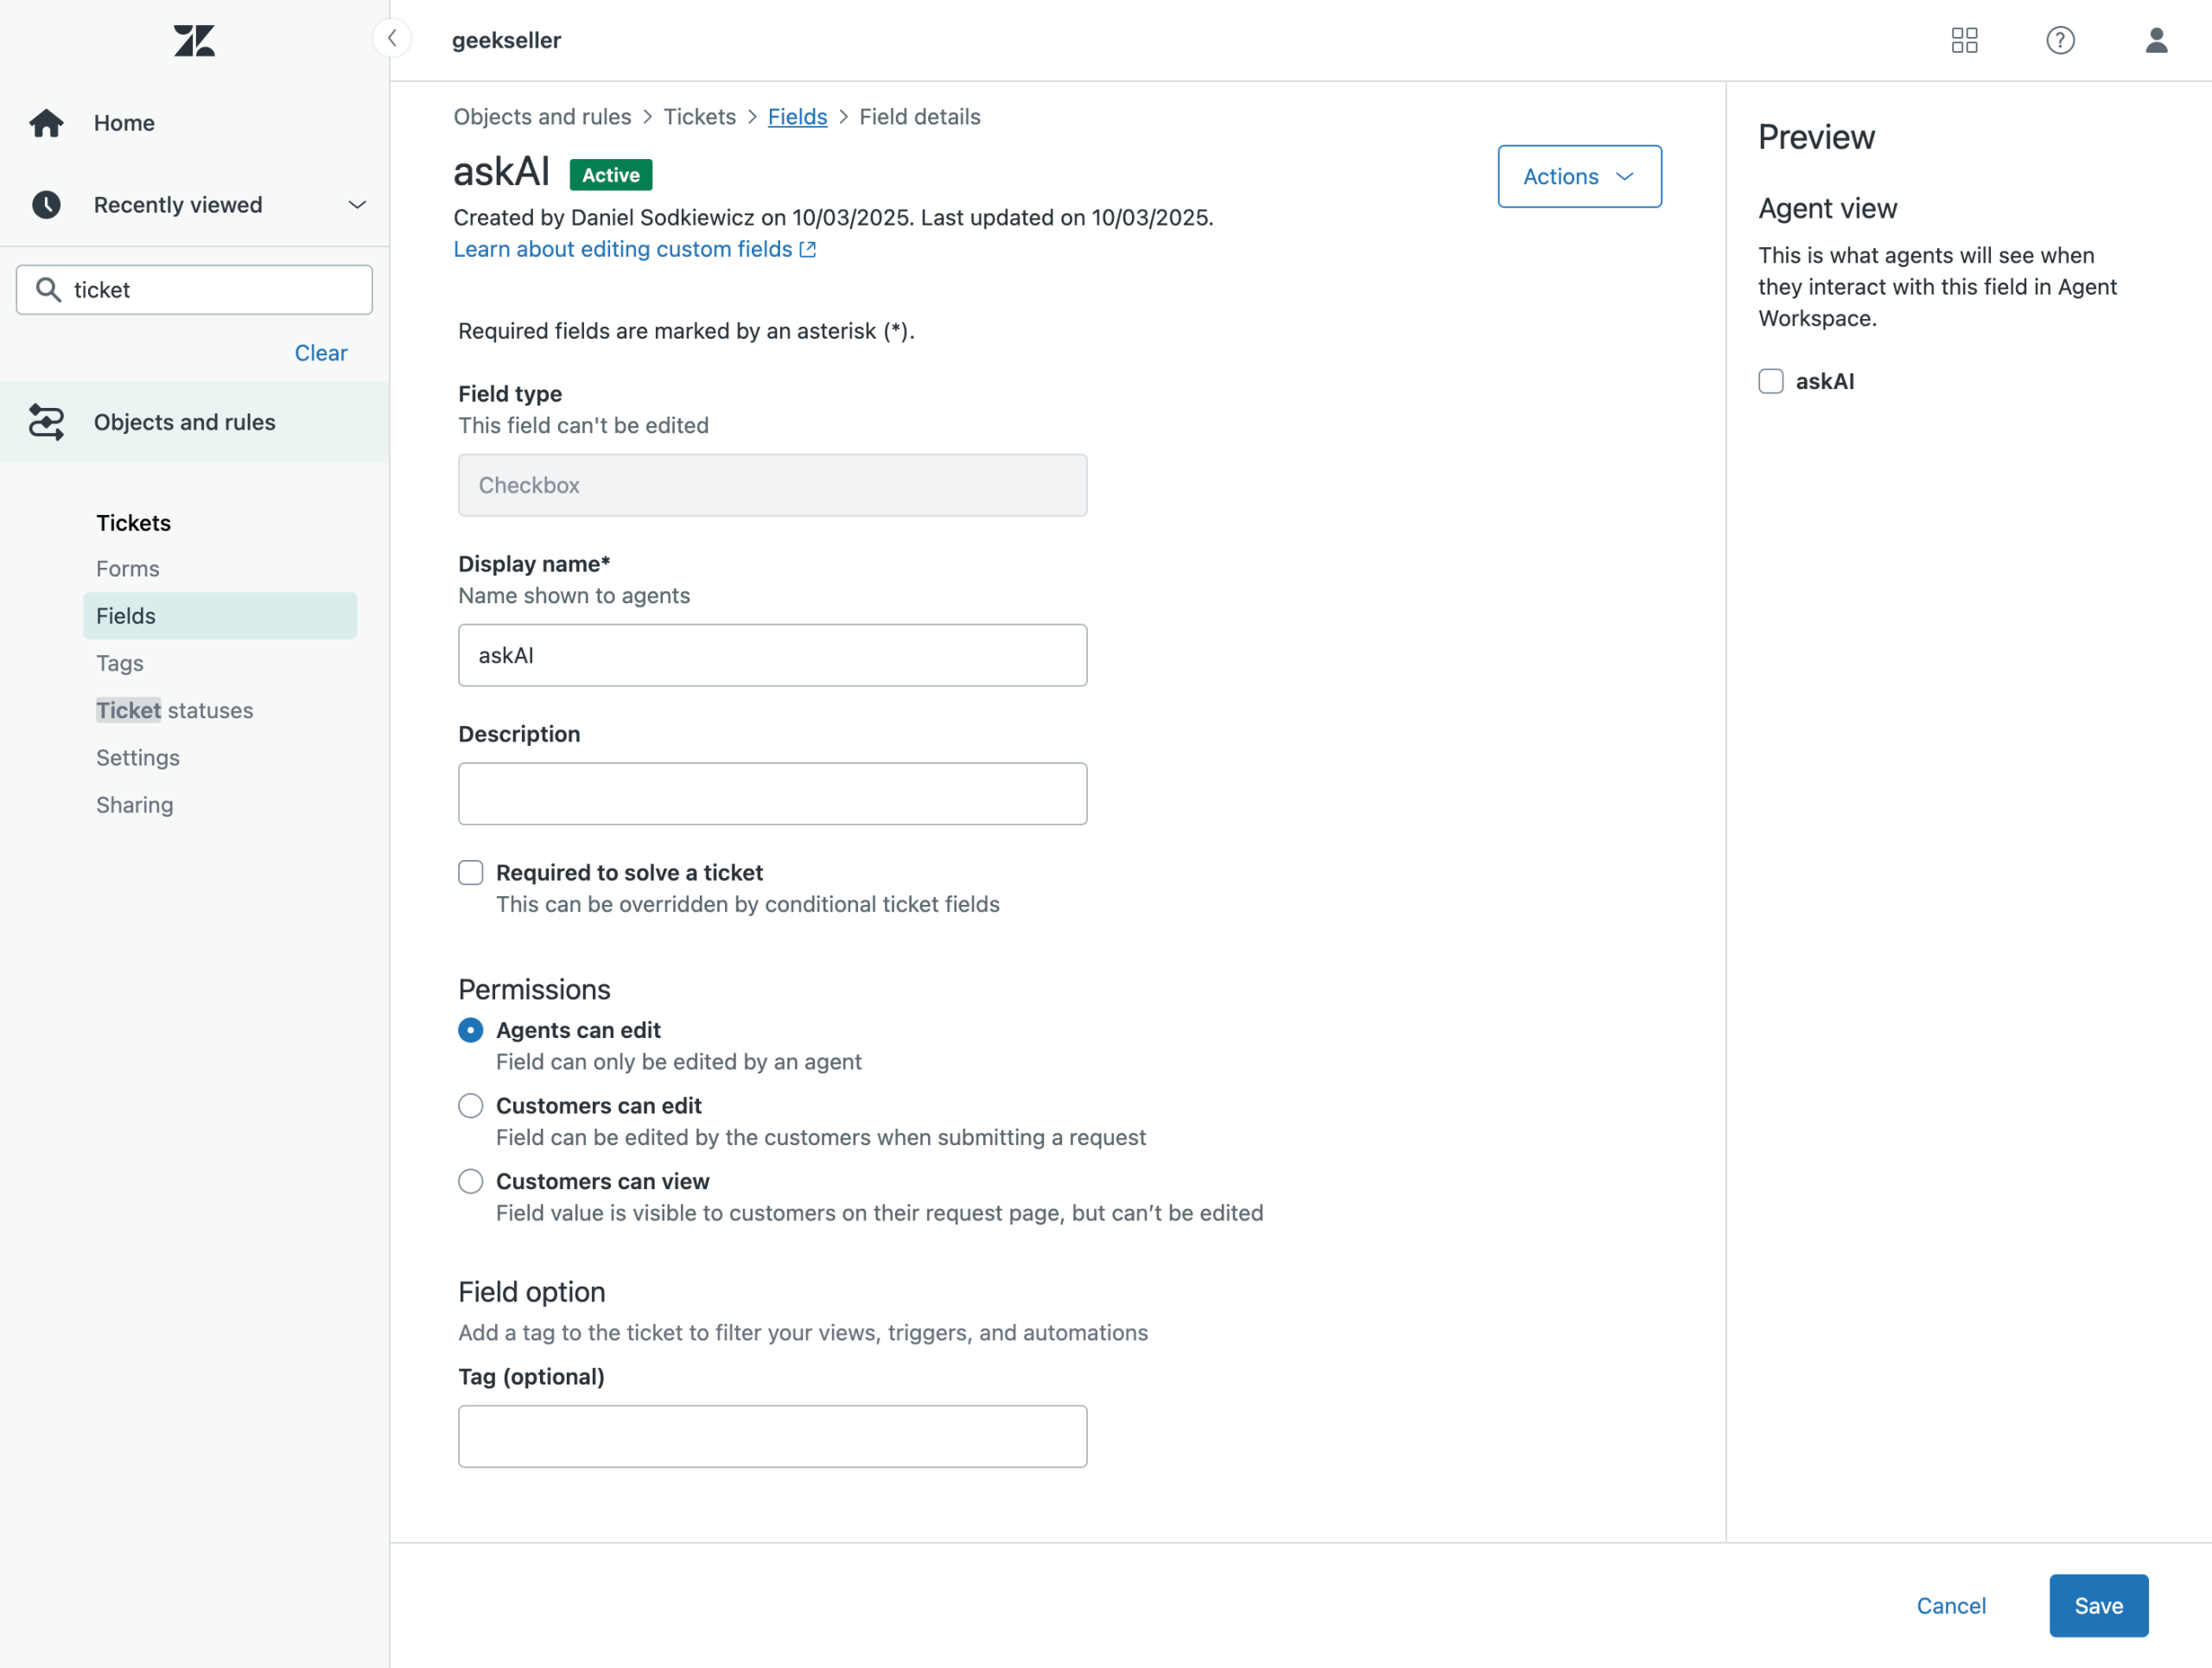
Creating an AI Indicator Field in Zendesk
To enable detection of whether a ticket was already processed by AI, I created a new custom checkbox field in Zendesk called askAI. This field is very useful for testing — I can manually check it to trigger the automation and observe how the workflow performs. Once everything is fully configured, Zendesk rules can automatically mark this field for tickets that should be processed by my AI assistant.
Below are screenshots showing how the field appears in the Zendesk Settings and how it looks within the Ticket Viewer.
Creating the OpenAI Assistant
To build the AI assistant, I used my OpenAI Developer account and followed the setup instructions to create a new Assistant. I then uploaded a file containing key company information that the assistant could reference when generating responses.
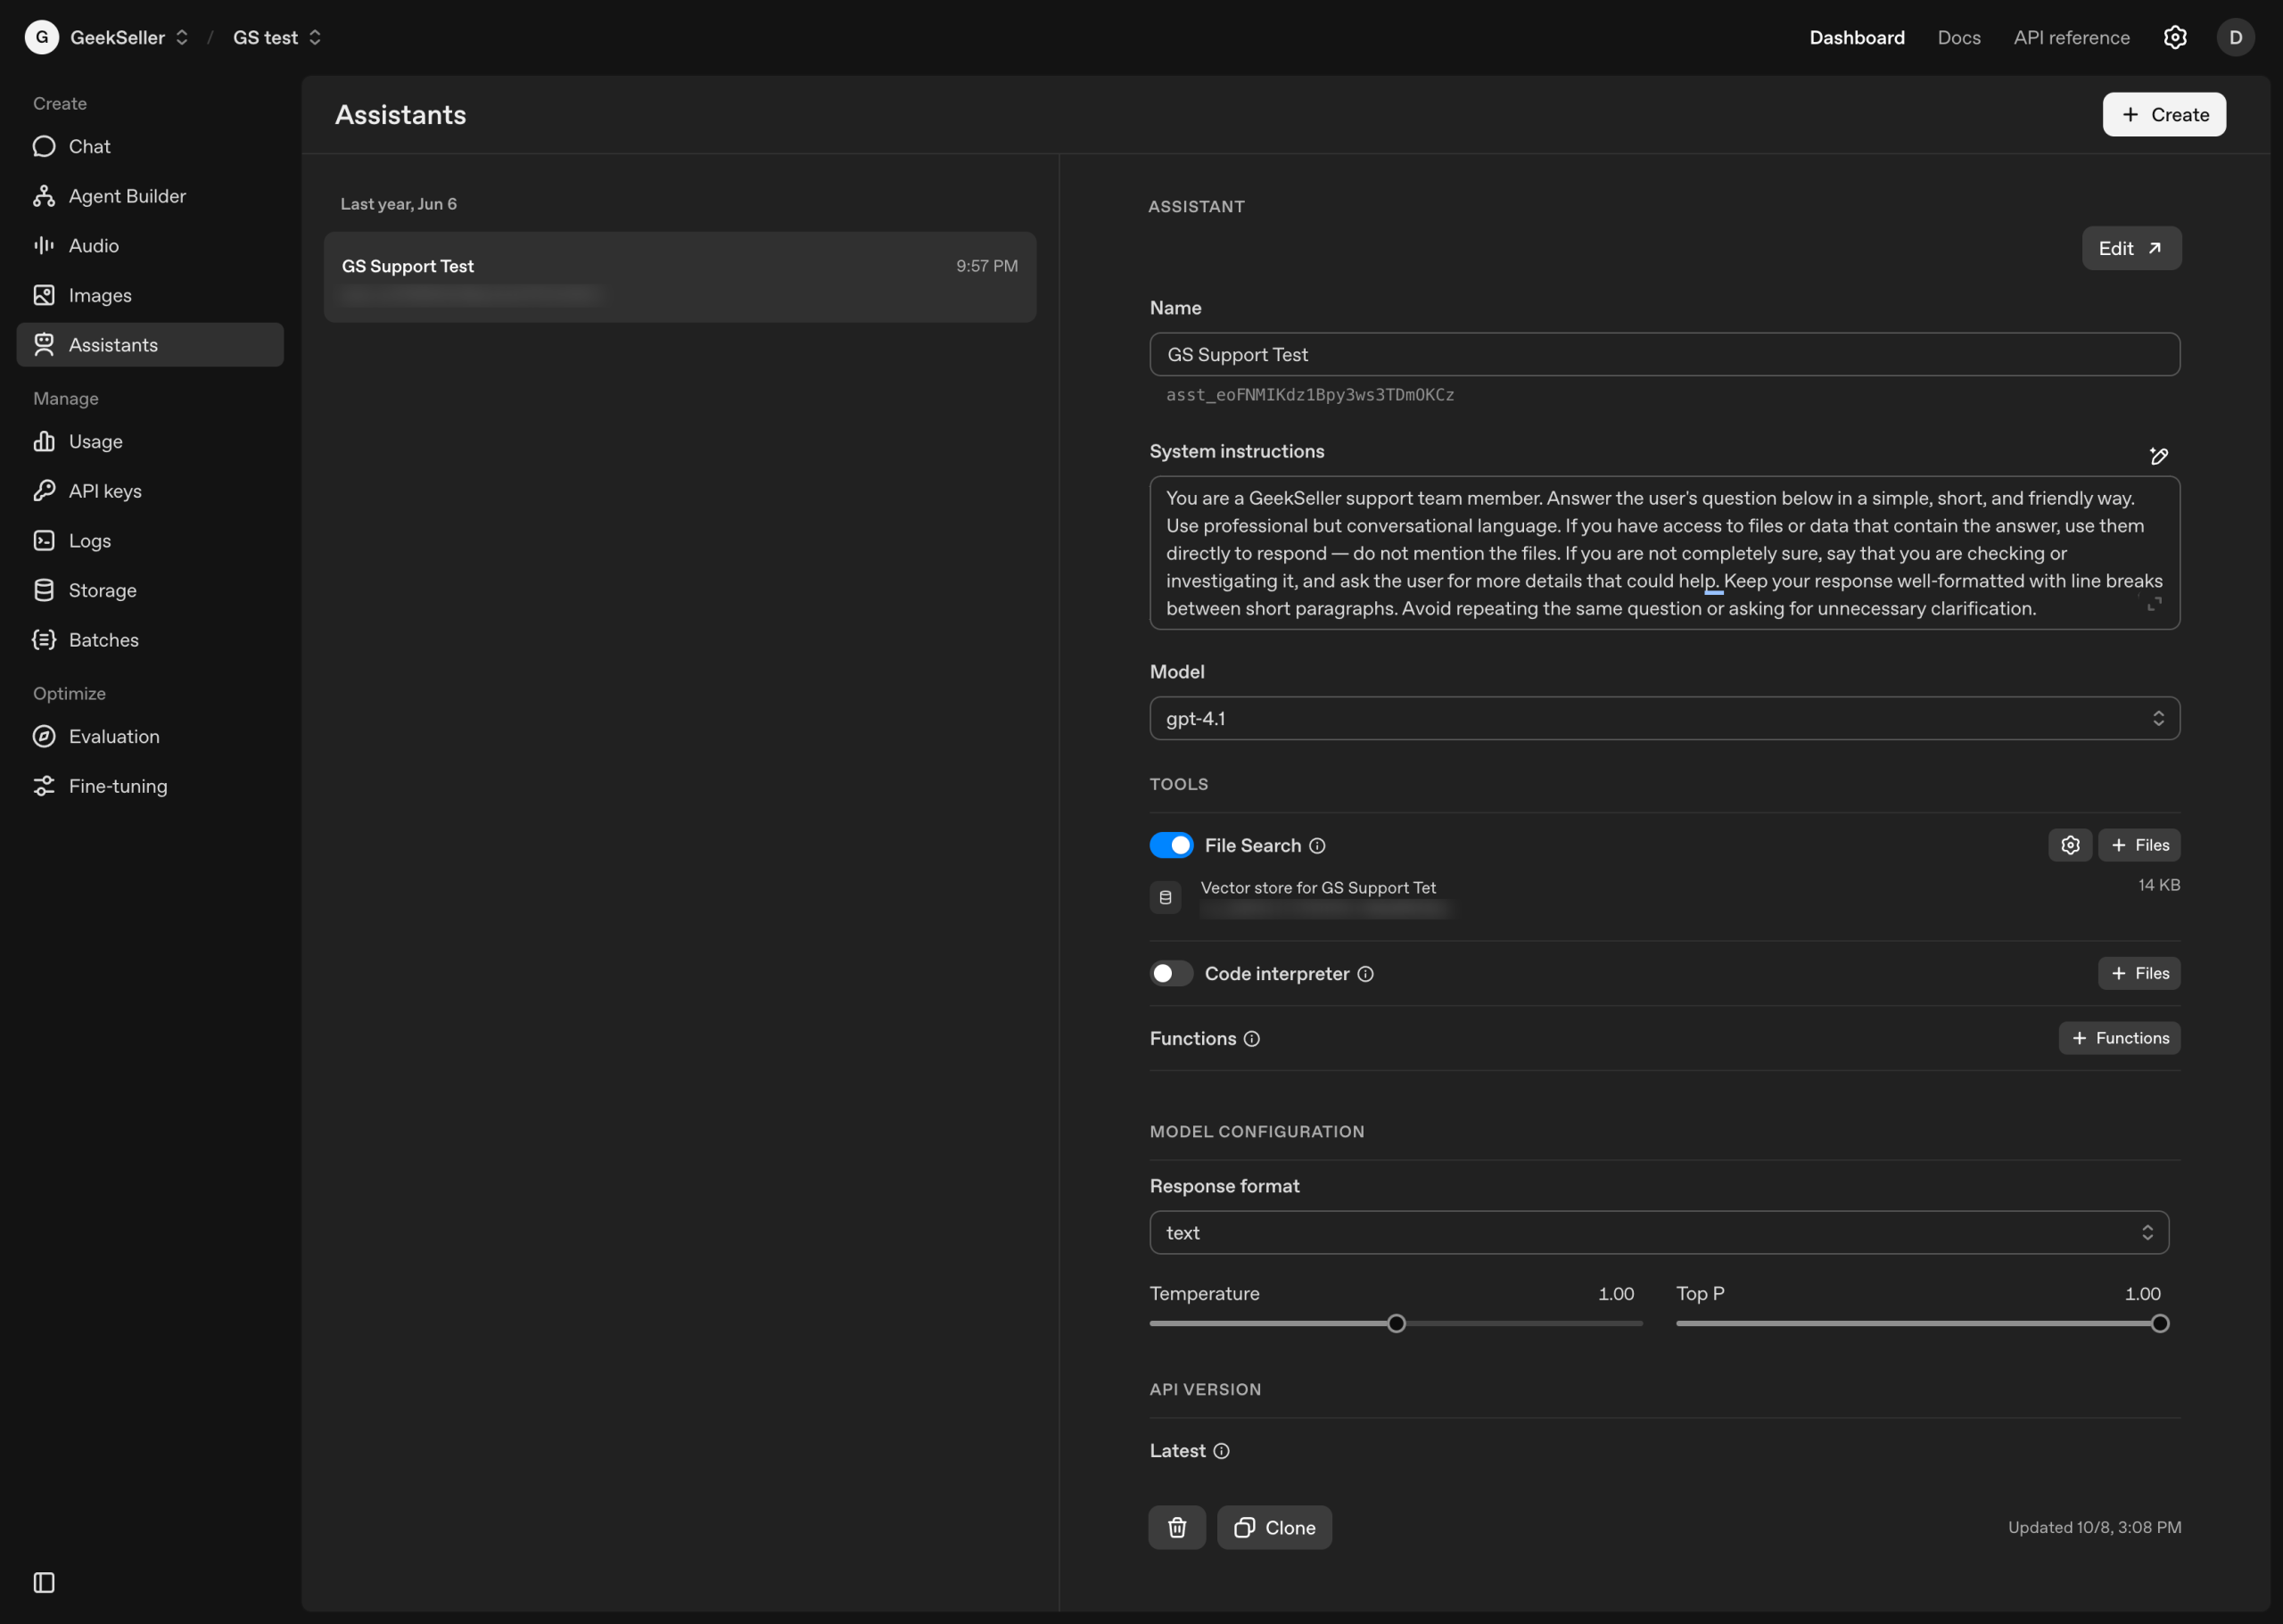
As recommended in the OpenAI documentation, the file was uploaded in .txt format with content structured using Markdown for clarity and organization. Below, I include a small sample of the file that describes what GeekSeller is and the services we offer.
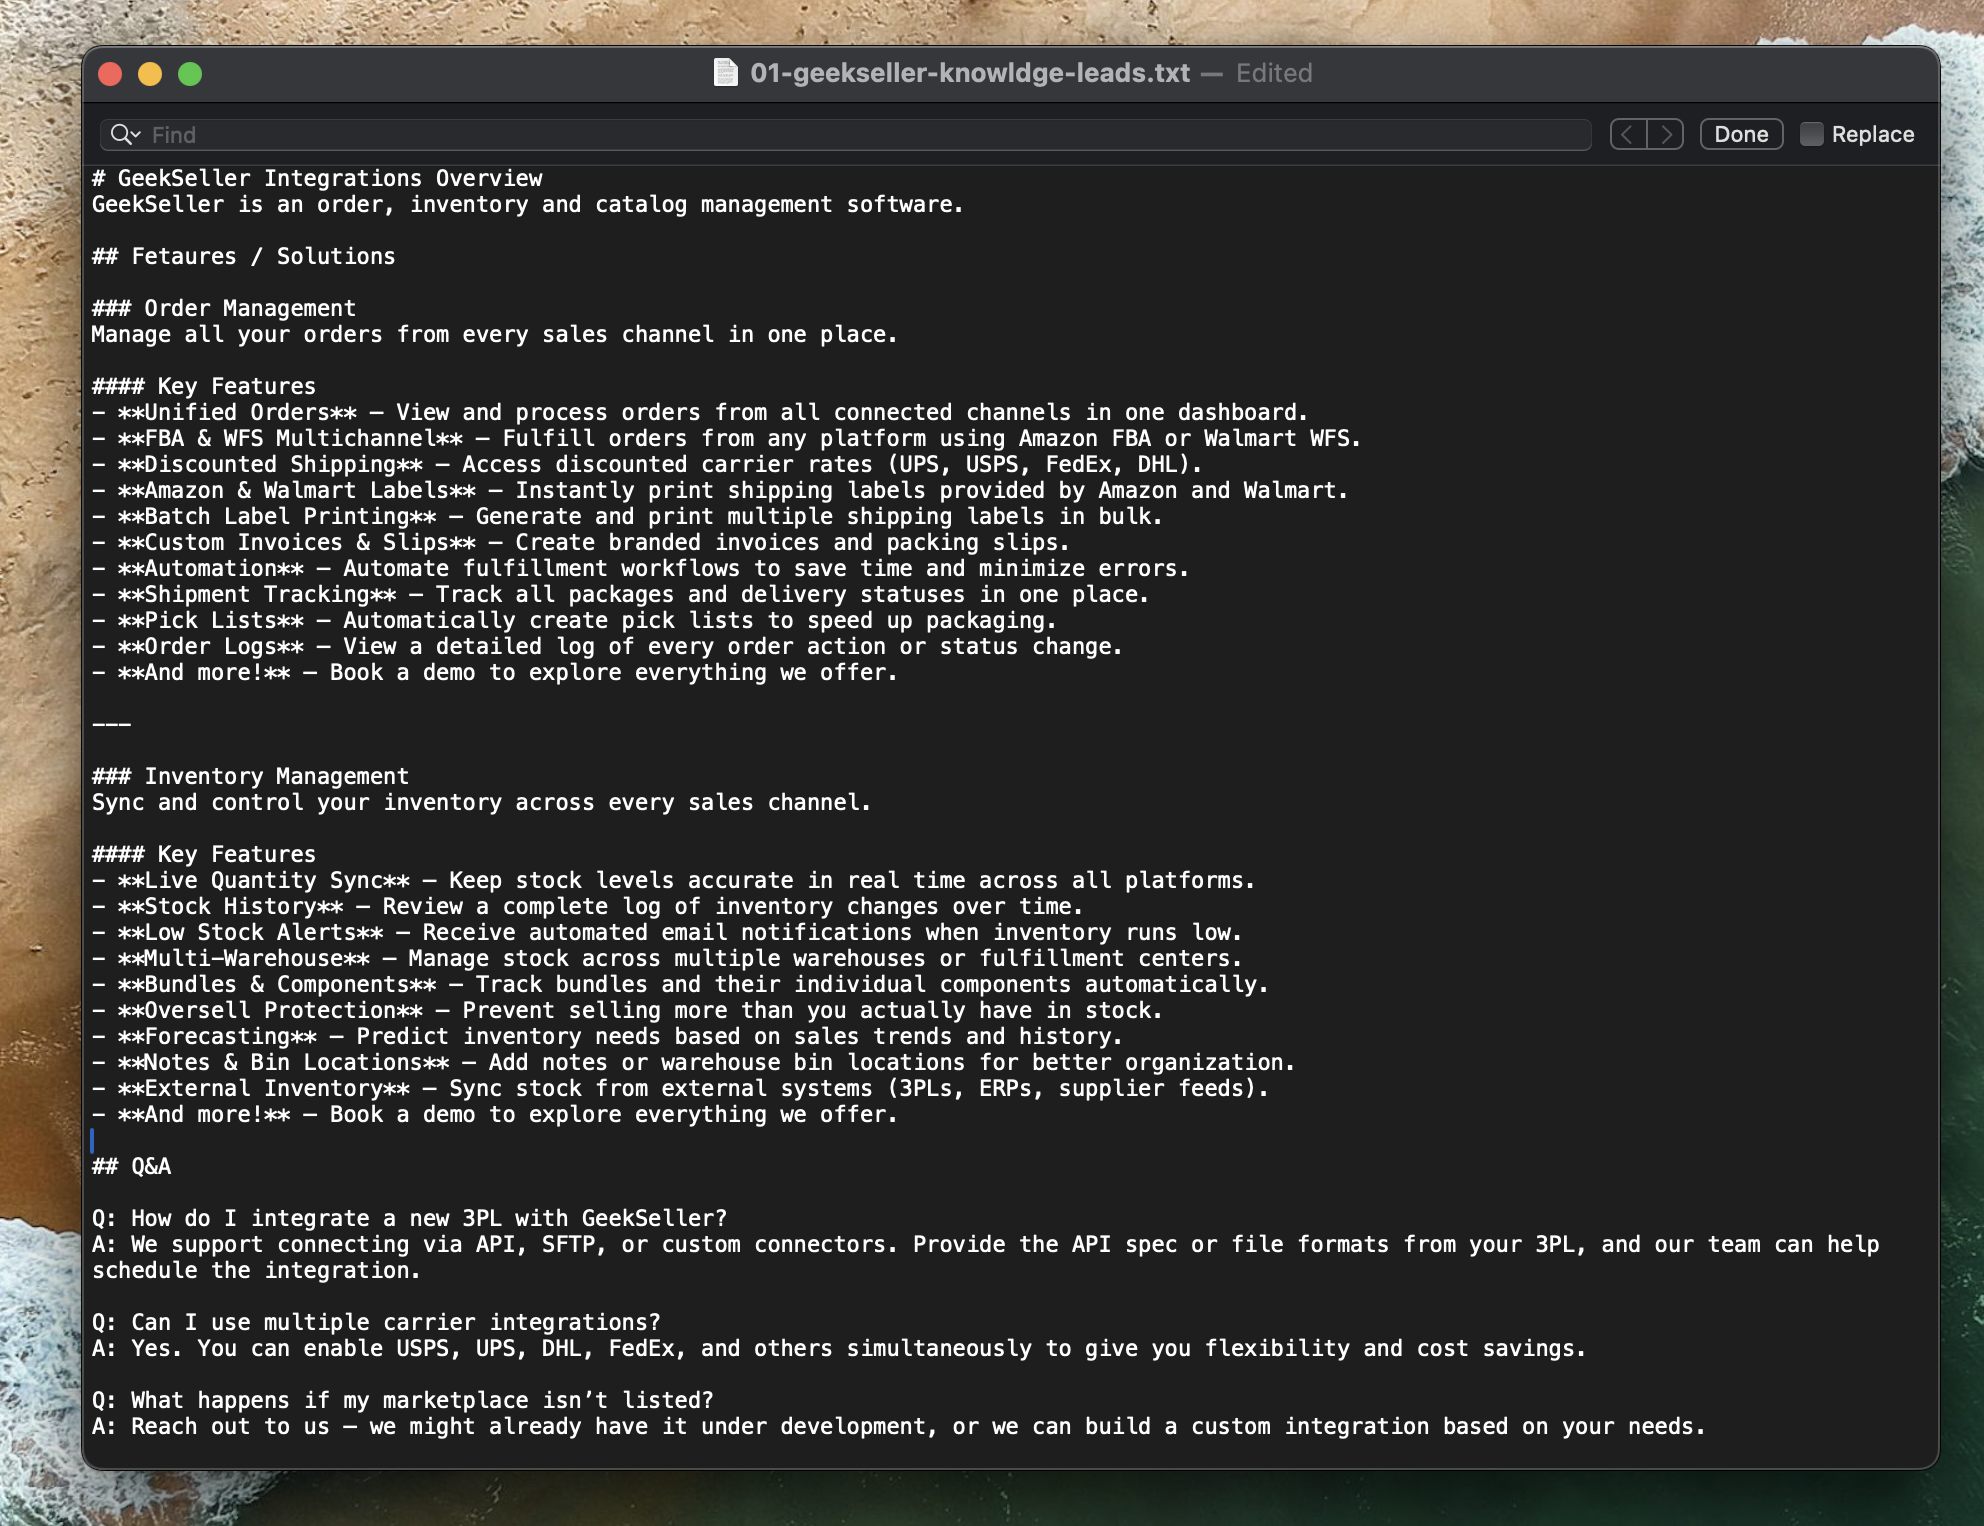
The AI assistant works best when information is formatted in a Q&A (Question and Answer) style — for example:
Q: What is GeekSeller?
A: GeekSeller is a multichannel e-commerce platform that helps sellers manage inventory, orders, and fulfillment across marketplaces.
This structure helps the model understand context and retrieve answers more accurately. The AI is smart enough to combine information from different questions and answers when forming a response, but it’s important to take time to prepare this file carefully.
You can use AI tools to help generate the initial Q&A pairs based on your existing documentation or knowledge base, but a human review is essential before uploading the file to ensure all answers are correct, clear, and aligned with your company’s messaging.
The upload of this file was done through the OpenAI Developer Portal, but it’s also possible to handle this programmatically. For example, you could create a script that automatically pulls updated data from another source, converts it to Markdown, and uploads it to the assistant on a regular basis.
It’s important to include plenty of relevant information in these files, keep them well-organized, and name them clearly. This makes it easier to maintain and update your assistant as your company or product evolves.
Useful links:
n8n Workflow Steps
The next step was to create the automation workflow in n8n that connects Zendesk and OpenAI. The flow is shown below. Each step of the automation is documented with a screenshot and a short description explaining its purpose.
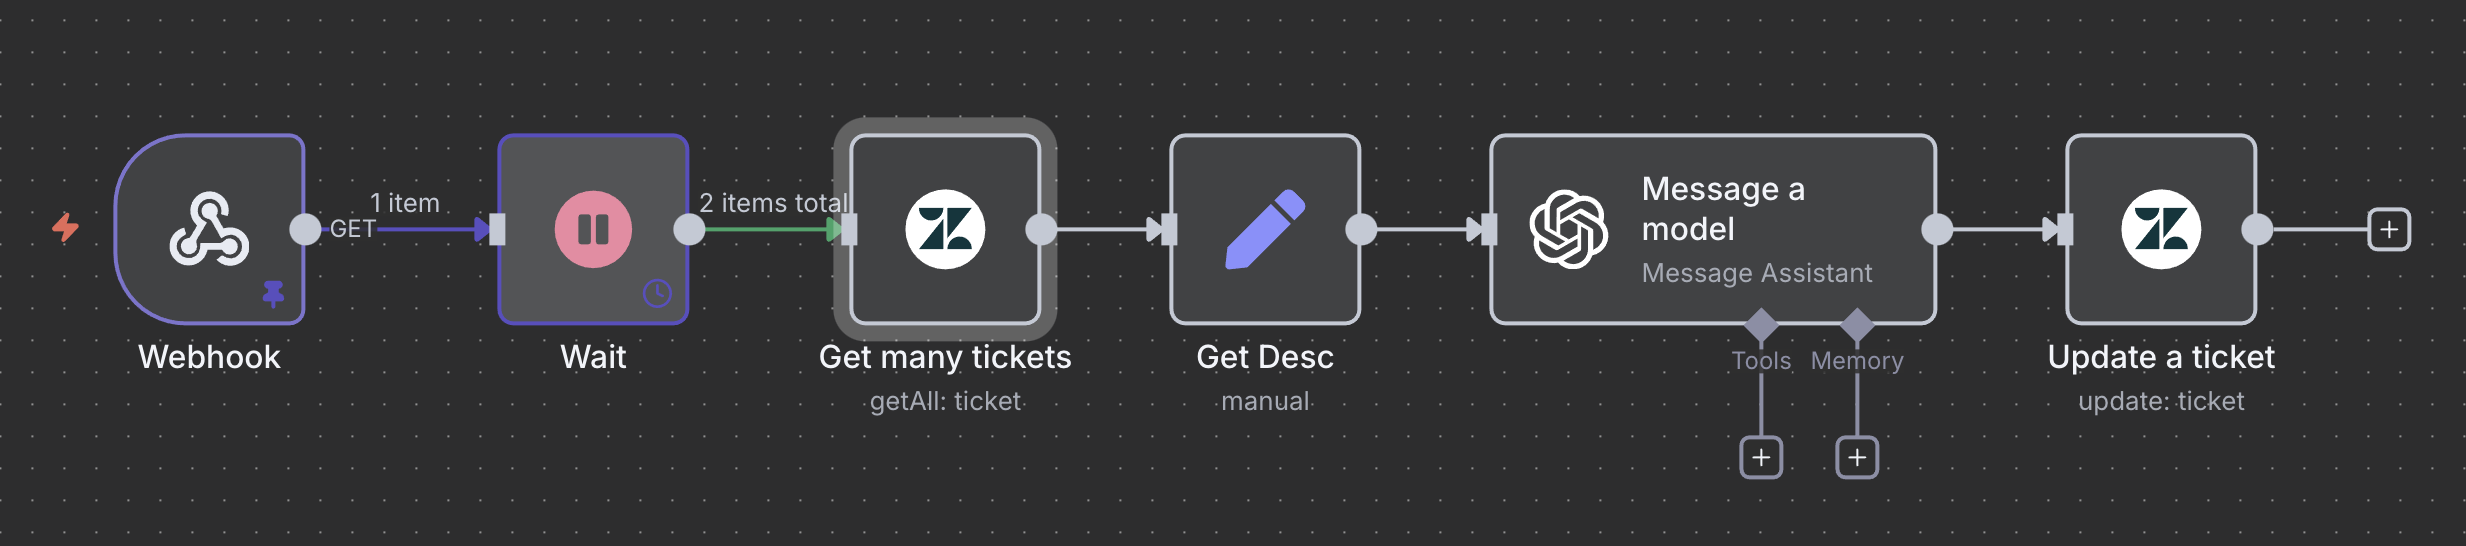
1. Webhook
This node is used to receive a call from Zendesk and trigger the automation workflow in n8n. Whenever a new ticket is created or updated, Zendesk can send a webhook request to start the process.
2. Wait
After the webhook is triggered, the workflow pauses for about 2 minutes. The reason for this delay is that Zendesk’s API doesn’t make new tickets available immediately — it can take up to a minute before they are visible through the API. Adding a 2-minute wait ensures that the ticket data is ready to be fetched.

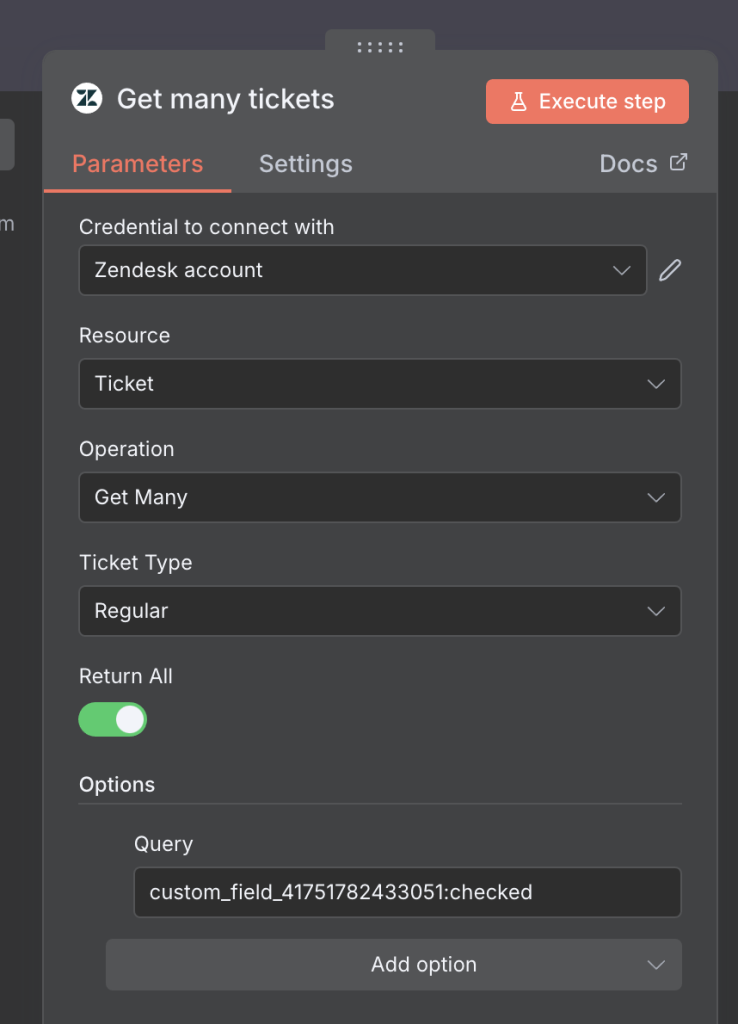
3. Get Many Tickets
This node retrieves ticket data from Zendesk.
I use a query such as custom_field_41751782433051:checked, where 41751782433051 is the ID of my custom field (askAI).
This query filters and returns only the tickets marked with that checkbox, ensuring that only tickets meant for AI processing are selected.
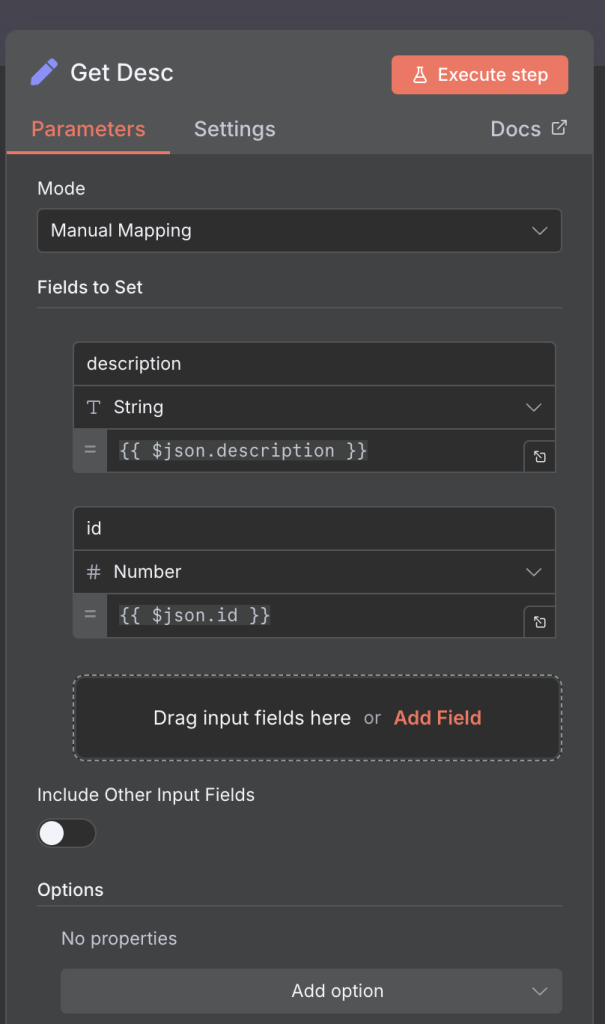
4. Get Desc
This step retrieves detailed information about the selected ticket — including the description and any other relevant fields needed to generate a response.
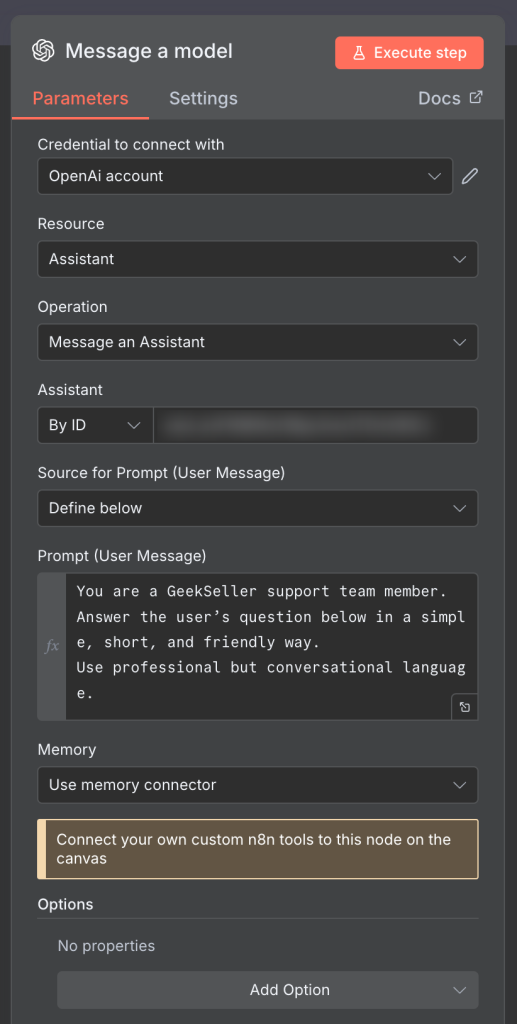
5. Message a Model
Here, the workflow connects to the appropriate OpenAI Assistant. It sends the ticket details and optionally includes additional instructions, although most context is already defined in the Assistant’s uploaded file. The Assistant then generates a suggested response.
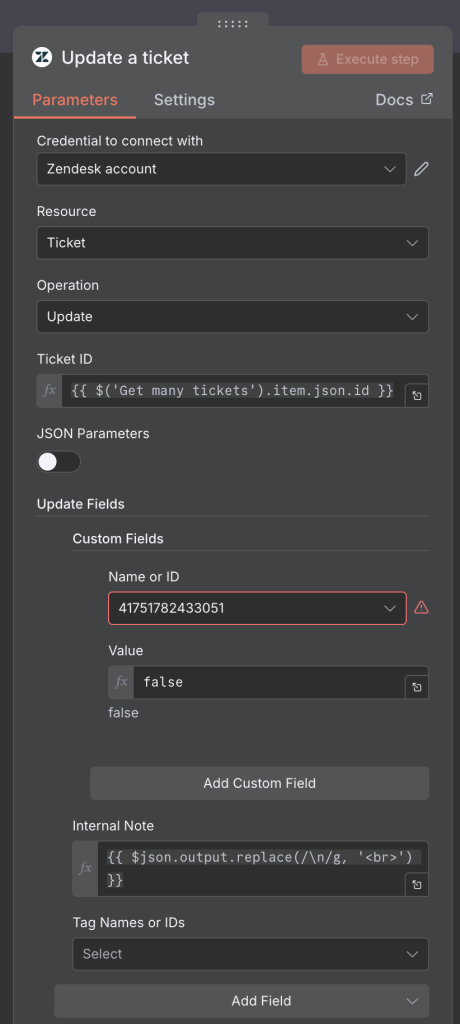
6. Update Ticket
Finally, the workflow sends the AI’s suggested reply back to Zendesk as an internal note on the ticket. It also updates the askAI checkbox field to false to indicate that the ticket has already been processed, preventing the system from generating a duplicate response.
Notice an error in the Custom Field section where I provide the ID of the field. It shows a warning, but the value is correct and the automation works as expected. You can ignore it — this seems to be a false warning from n8n.
Also notice that using {{ $json.output.replace(/\n/g, '<br>') }} nicely formats the message for Zendesk by converting line breaks into HTML <br> tags. This ensures the response appears clean and readable inside the Zendesk ticket.
Triggering the Flow from Zendesk
The final step is to trigger the n8n workflow from Zendesk.
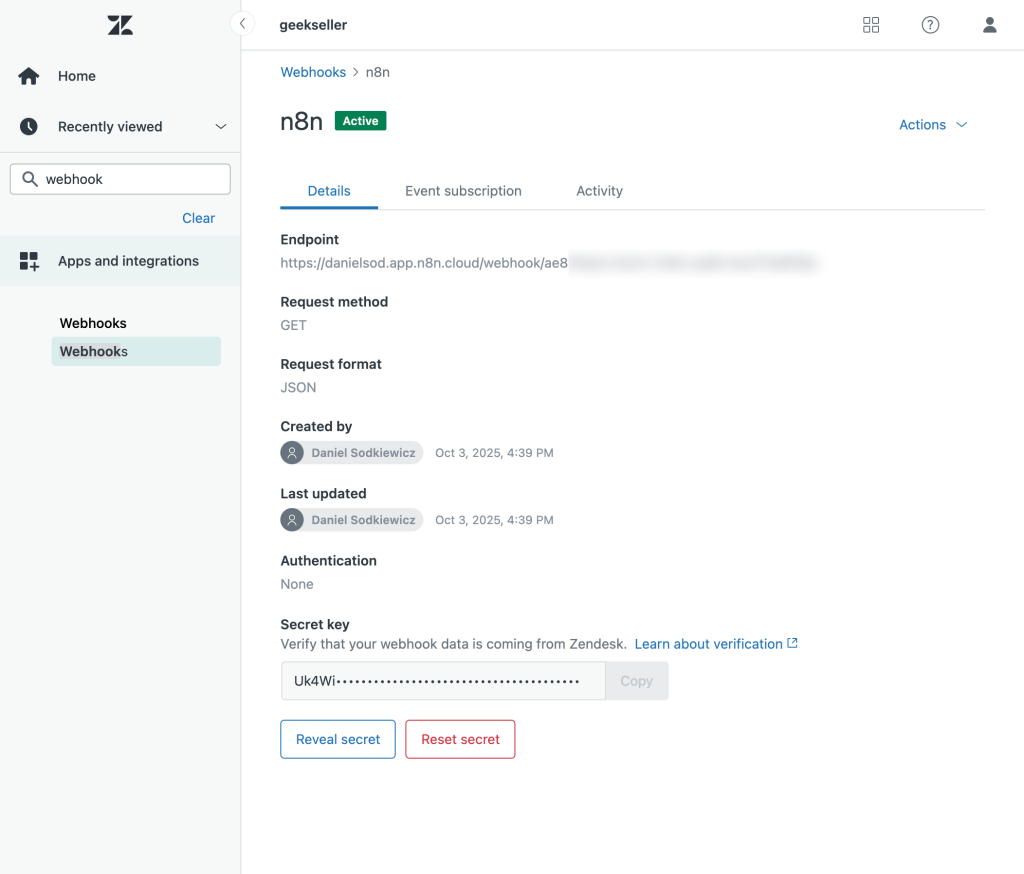
Go to the Webhook node in n8n and copy the generated URL — make sure to copy the correct one (either test or live) depending on which version of your flow you’re using. This URL will be used inside Zendesk.
First, you need to create a Webhook in Zendesk, as shown below.
This webhook should make a GET request to your n8n endpoint.
Once the webhook is created, set up a Zendesk Trigger that calls this webhook whenever the conditions are met — for example, when the askAI checkbox is selected.
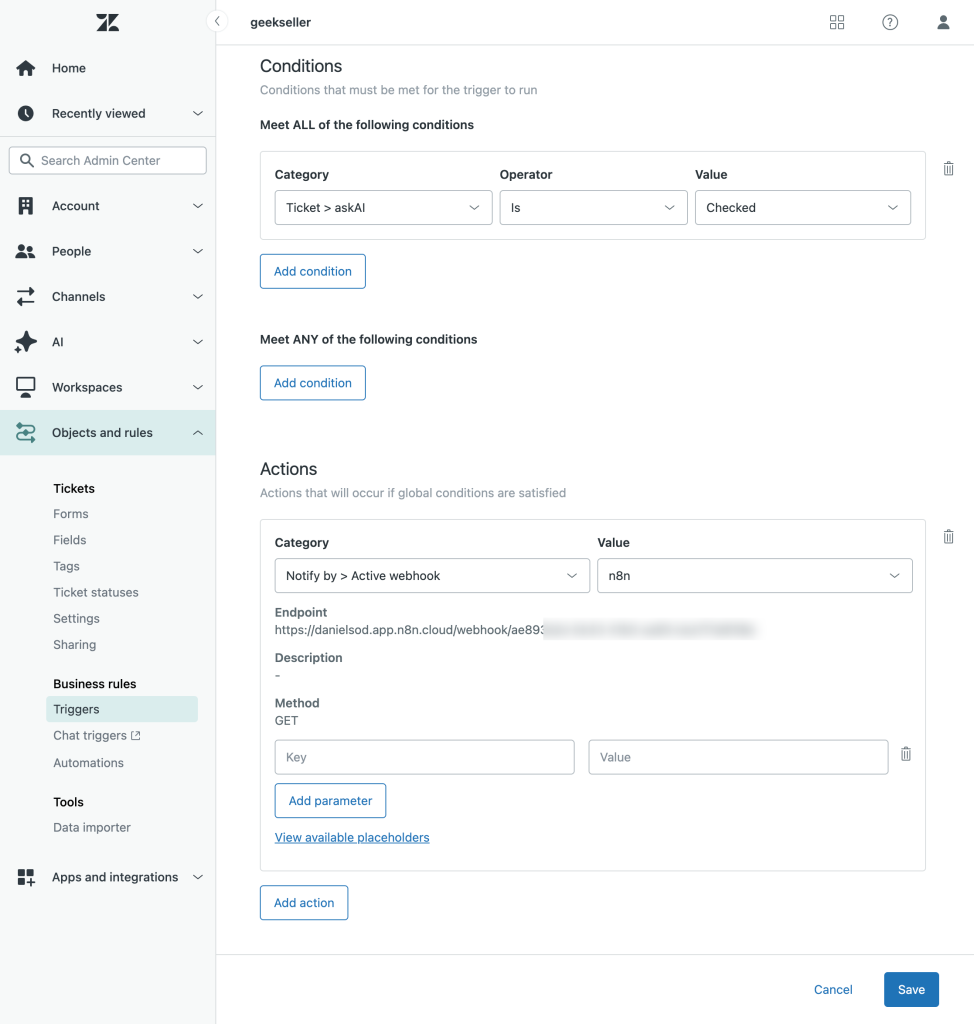
For testing purposes, I created a setup where selecting the askAI checkbox and updating the ticket automatically triggers the n8n flow.
Later, you can create additional Zendesk triggers to automatically check the askAI field for new tickets that you want the AI assistant to process. The exact rules depend on your workflow and which tickets should be handled by the automation.
What’s Next
In the next phase of this project, I plan to enhance the automation with additional logic and notifications.
- First, I’ll add an IF condition in the n8n workflow to determine whether the requester is a new lead or an existing user. Based on this check, the system will call a different OpenAI Assistant — each tailored to handle its own type of communication.
- I also plan to integrate Slack notifications for urgent tickets. For example, if a ticket marked as urgent arrives during the weekend or outside business hours, the system will automatically send an alert to our Slack channel. This will help ensure that critical cases are noticed quickly, even when our support team isn’t actively monitoring Zendesk.